Product News
How to replace the cone of a speaker
Views : 8519
Update time : 2024-08-12 10:20:21
If your speaker is distorted and the sound is fuzzy when playing, it may be caused by damage to the inside of the cone or material fatigue. If the low frequency performance is poor, you may need to check the integrity and elasticity of the cone. After long-term use, the cone material may age due to environmental factors (such as temperature and humidity), resulting in a decrease in sound quality. Of course, if you want to improve the sound quality of the speaker, you may consider replacing it with a higher quality cone.
Before making a replacement, it is recommended to conduct a comprehensive inspection of the speaker to confirm whether the source of the problem is indeed a damaged cone, and consider professional repair or modification suggestions.
* To extend the service life of the speaker, the user needs to set the limit parameters on the processor (or active DSP module) and the playback signal should not be too large, otherwise it is easy to damage the speaker due to excessive signal.
When you confirm that you need to replace the cone, you need to prepare the following tools and materials:
Next are the main steps
1. Remove the speaker
Turn off the sound system and unplug the power.
Carefully remove the speaker unit. Depending on the specific model, a screwdriver or other tool may be required.
After removing the speaker, remember the location of the connected cables, or write them down on paper for subsequent connections.
2. Remove the old cone
Check how the cone is attached to the speaker chassis. Usually it is glued.
Use a blade to gently peel off the old cone to avoid damaging the chassis.
Clean the chassis to make sure there is no glue residue and dirt.
3. Install the new cone
Trim the edges of the new cone as needed to ensure it fits.
Apply glue evenly to the bonding area of the chassis.
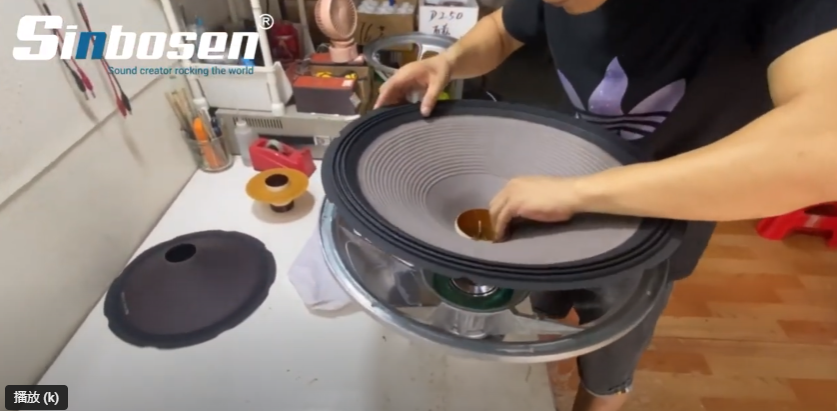
Carefully place the new cone on the chassis, making sure it is aligned with the center.


4. Curing and testing
Use a clamp to fix the cone to ensure it does not move during curing.
Wait for the fixing time according to the instructions of the glue used (usually a few hours to a day).
Once completed, check that the cone is secure and make sure it is not loose or deviated.

5. Reconnect the speaker
Reinstall the speaker into the speaker and connect the cables according to the previously recorded positions.
Make sure all connections are normal and not loose.
6. Test the speaker
Reconnect the power supply and test the sound quality and function of the speaker. Listen for any noise to confirm that the new cone is working properly.
Here are some more things to note:
1. Make sure you work in a well-ventilated environment and use safe tools.
2. If you are unsure of the operation or have no experience, it is recommended to seek help from a professional to avoid damaging the equipment.
3. Choose a new cone that matches the specifications of the original cone to ensure the best sound quality and performance.
* To extend the service life of the speaker, the user needs to set the limit parameters on the processor (or active DSP module) and the playback signal should not be too large, otherwise it is easy to damage the speaker due to excessive signal.
With these steps, you should be able to successfully replace the cone of the speaker and make repairs.
I hope the above tutorials are helpful to you.
If you have any questions, please contact us
Before making a replacement, it is recommended to conduct a comprehensive inspection of the speaker to confirm whether the source of the problem is indeed a damaged cone, and consider professional repair or modification suggestions.
* To extend the service life of the speaker, the user needs to set the limit parameters on the processor (or active DSP module) and the playback signal should not be too large, otherwise it is easy to damage the speaker due to excessive signal.
When you confirm that you need to replace the cone, you need to prepare the following tools and materials:
●New cone (speaker diaphragm)
●Glue or tape (special speaker glue,AB glue)
●Blade or knife
●Scissors
●Screwdriver
●Cleaning cloth
●Clamp (playing cards)
●Glue or tape (special speaker glue,AB glue)
●Blade or knife
●Scissors
●Screwdriver
●Cleaning cloth
●Clamp (playing cards)
Next are the main steps
1. Remove the speaker
Turn off the sound system and unplug the power.
Carefully remove the speaker unit. Depending on the specific model, a screwdriver or other tool may be required.
After removing the speaker, remember the location of the connected cables, or write them down on paper for subsequent connections.
2. Remove the old cone
Check how the cone is attached to the speaker chassis. Usually it is glued.
Use a blade to gently peel off the old cone to avoid damaging the chassis.
Clean the chassis to make sure there is no glue residue and dirt.
3. Install the new cone
Trim the edges of the new cone as needed to ensure it fits.
Apply glue evenly to the bonding area of the chassis.
Carefully place the new cone on the chassis, making sure it is aligned with the center.


4. Curing and testing
Use a clamp to fix the cone to ensure it does not move during curing.
Wait for the fixing time according to the instructions of the glue used (usually a few hours to a day).
Once completed, check that the cone is secure and make sure it is not loose or deviated.

5. Reconnect the speaker
Reinstall the speaker into the speaker and connect the cables according to the previously recorded positions.
Make sure all connections are normal and not loose.
6. Test the speaker
Reconnect the power supply and test the sound quality and function of the speaker. Listen for any noise to confirm that the new cone is working properly.
Here are some more things to note:
1. Make sure you work in a well-ventilated environment and use safe tools.
2. If you are unsure of the operation or have no experience, it is recommended to seek help from a professional to avoid damaging the equipment.
3. Choose a new cone that matches the specifications of the original cone to ensure the best sound quality and performance.
* To extend the service life of the speaker, the user needs to set the limit parameters on the processor (or active DSP module) and the playback signal should not be too large, otherwise it is easy to damage the speaker due to excessive signal.
With these steps, you should be able to successfully replace the cone of the speaker and make repairs.
I hope the above tutorials are helpful to you.
If you have any questions, please contact us
Contact us:
 sales2@sinbosen.com
Whatsapp:https://api.whatsapp.com/send?l=en&phnoe=8616676738225
Website:https://www.sinbosenaudio.com/
Whatsapp:https://api.whatsapp.com/send?l=en&phnoe=8616676738225
Website:https://www.sinbosenaudio.com/


